
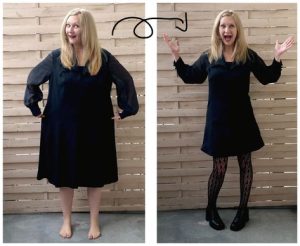
A beloved dress that no longer fits quite right can be frustrating. But don’t despair! There are several ways to adjust a dress that’s too big, allowing you to wear it again with confidence. This guide will explore various techniques for taking in a dress, from simple no-sew methods to more involved sewing projects.
Before diving in, it’s important to assess the dress and your comfort level. For delicate fabrics or intricate designs, consulting a tailor might be the best option. However, for many dresses, taking them in at home is a manageable DIY project.
Getting Started: Assessing the Dress
Before altering your dress, gather some key information:
Fabric Type:
Knowing the fabric type (cotton, linen, silk, etc.) will help determine the most suitable technique.
Amount of Ease:
Ease refers to the looseness of the garment. Pinch the excess fabric at the seams to estimate how much needs to be taken in. A good rule of thumb is to start small and take in a little at a time. You can always remove more fabric, but you can’t add it back!
Seams and Construction:
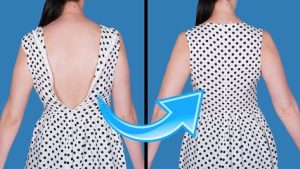
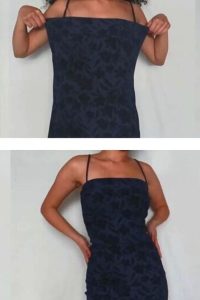
Look at the dress’s construction. Taking in side seams is generally the easiest approach. However, depending on the style, you might also be able to take in darts or the shoulder seams.
Once you’ve assessed the dress, you can choose the technique that best suits your skills and the dress’s design.
Quick Fixes: No-Sew Solutions (for simple adjustments)
For a quick and easy fix on a loose-fitting dress made from a forgiving fabric (like cotton or jersey knit), consider these no-sew options:
-
Safety Pins: Strategic use of safety pins can temporarily take in your dress. Pinch the excess fabric where needed and secure it with a safety pin. This is a great option for trying out different adjustments before committing to a more permanent solution.
-
Belts and Sashes: Cinch your waist with a belt or sash to create a more fitted silhouette. This works well for dresses with a defined waistline.
-
Double-Sided Fashion Tape: Fashion tape can temporarily hold in fabric folds or create darts. This is a good option for delicate fabrics or areas where stitching might show.
Remember, no-sew solutions are temporary. They can be a lifesaver in a pinch, but they might not be suitable for long-term wear.

Taking in Your Dress with Sewing (for a more permanent solution)
If you’re comfortable with sewing, here are some techniques for taking in your dress:
-
Side Seams: This is the simplest and most common way to take in a dress. Turn the dress inside out, and mark a new seam line with pins or chalk. Leaving seam allowances in mind, sew a new seam along the marked line. Try the dress on inside out to check the fit, and make any necessary adjustments before trimming excess fabric and finishing the new seam.
-
Darts: Darts are tapered folds sewn into fabric to create a more fitted shape. They can be placed strategically on the bodice or skirt of the dress to take it in. There are different types of darts, so research online tutorials to find the best placement for your dress’s style.
-
Taking in the Shoulders: This technique requires more sewing expertise but can be effective for dresses with extra fabric around the shoulders. There are different ways to take in shoulders, so consult online resources or a sewing guide for specific instructions.
Sewing allows for more permanent and precise alterations. However, it’s important to choose the right technique for the dress’s design and your sewing skill level.
Tips for Sewing Success
Here are some tips to ensure your sewing project goes smoothly:
-
Use sharp sewing needles and matching thread.
-
Start with small seam allowances and adjust as needed.
-
Iron your seams open for a professional finish.
-
If you’re unsure about a step, consult a sewing guide or online tutorial.
-
Take your time and be patient!
With a little practice and these helpful tips, you can take in your dress and give it a new lease on life!
Taking in a dress is a rewarding DIY project that allows you to revive a favorite piece and achieve a perfect fit. Start with a simple technique and gradually build your skills. Remember, even small alterations can make a big difference in how a dress looks and feels on you. So grab your sewing supplies, unleash your creativity.
Sewing Success Tips
-
Prepare your workspace: Find a well-lit area with a flat surface big enough to lay your dress flat. Gather your sewing supplies, including needles, thread, pins, scissors, and a seam ripper (in case you need to undo any stitches).
-
Sharpen your sewing needles: Dull needles can damage fabric and make sewing more difficult.
-
Matching thread matters: Choose thread that matches the color and weight of your dress fabric.
-
Start small: When taking in seams, it’s better to err on the side of caution. Take in a small amount at first, try on the dress, and adjust as needed. You can always remove more fabric, but you can’t add it back!
-
Iron your seams open: Once you’ve sewn a new seam, ironing it open will help it lay flat and create a professional finish.
-
Online resources are your friends: There are countless online tutorials and sewing guides available. If you’re unsure about a particular step, don’t hesitate to search for visual aids or instructions!
-
Take your time and be patient! Sewing alterations require patience and precision. Don’t rush through the process, and enjoy the satisfaction of creating a garment that fits you perfectly.
With a little practice and these helpful tips, you’ll be well on your way to transforming your dress and giving it a new lease on life!
The Joy of DIY Dress Alterations
Taking on a DIY dress alteration project can be empowering and rewarding. It allows you to revive a cherished piece in your wardrobe and achieve a perfect fit. Remember, even small adjustments can make a big difference in how a dress looks and feels on you.
So don’t be discouraged if your first attempt isn’t perfect. The key is to embrace the learning process and have fun with it! With a bit of practice and these helpful guides, you’ll be well on your way to mastering the art of dress alterations and transforming your wardrobe.