
Giving an old dress new life with a fresh coat of black dye can be a fun and rewarding project. Black is a versatile and timeless color that flatters many styles and body types. However, dyeing clothes requires a bit of preparation to achieve the best results. Safety is also important, so follow these steps carefully.
Before you begin:
- Safety first! Dyeing can involve chemicals. Wear gloves and eye protection throughout the process. Also, ensure good ventilation in your workspace.
- Fabric matters. Not all fabrics take dye well. Natural fibers like cotton, linen, and rayon typically absorb dye better than synthetic fabrics like polyester or nylon. Check the care label on your dress to identify the fabric content.
- Choose the right dye. Look for a fiber-reactive dye suitable for the fabric content of your dress. Black dye is readily available at most craft stores.
Preparing Your Dress for Dyeing
Wash your dress thoroughly.
Dirt, oils, and residues can prevent the dye from adhering evenly. Skip fabric softener, as it can also affect dye absorption. Let the dress dry completely.
Mend any tears or rips.
Dye can make flaws more noticeable.
Gather your supplies.
In addition to dye and gloves, you’ll need a large basin or bucket, a mixing spoon, salt (for natural fibers), and a drying rack.

The Dyeing Process: Step-by-Step
-
Fill your basin with hot water. The amount of water will depend on the size of your dress. Consult the dye instructions for the recommended water-to-dye ratio.
-
Dissolve the dye. Add the dye to the hot water and stir well until completely dissolved. If using dye for natural fibers, add salt at this stage according to the dye instructions. Salt helps the dye penetrate the fabric more evenly.
-
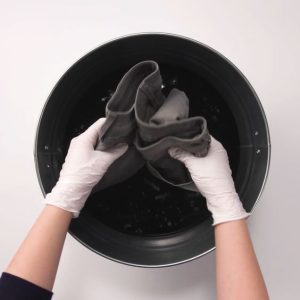
Wet your dress. Submerge the dress completely in the hot water dye bath. Gently agitate the dress to ensure all parts are saturated.
-
Maintain the heat. Keep the dye bath hot, preferably around 140°F (60°C) for at least 30 minutes. You can use a stovetop on low heat to maintain the temperature. Stir the dye bath occasionally to ensure even dyeing.
-
Checking the color. After 30 minutes, put on gloves and carefully remove a small section of the dress from the dye bath. Rinse the test area in cool water and check the color. If the color is too light, return the dress to the dye bath and continue dyeing for longer intervals, checking the color periodically.
-
Rinse thoroughly. Once you’ve achieved the desired color, carefully remove the dress from the dye bath. Rinse the dress thoroughly in cool water until the rinse water runs clear.
-
Wash the dyed dress. Wash the dyed dress in cold water with a gentle detergent. This helps remove any excess dye and sets the color. Important! Wash the dyed dress separately for the first few washes to avoid staining other clothes.
-
Dry the dress. Wash the dress in warm water with a mild detergent to remove any remaining dye. This also helps set the color. Rinse thoroughly and hang to dry or use a dryer if the fabric allows.
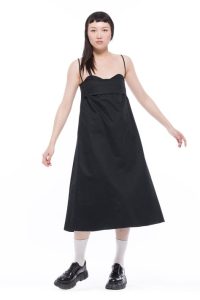
Congratulations! You’ve successfully dyed your dress black. It’s now ready to be styled and enjoyed!

Tips for Long-Lasting Color
- Use high-quality dye for better colorfastness.
- Wash the dyed dress in cold water and use a gentle detergent to minimize color fading.
- Avoid exposing the dyed dress to excessive sunlight, as this can cause fading.
Dyeing your dress black can be a fun and affordable way to refresh an old garment. By following these steps carefully and prioritizing safety, you can achieve a bold new look for your dress. Enjoy giving your clothes a second life with the power of dye!

Finding Your Perfect Black
Black dye can come in subtle variations, so consider the look you’re going for:
- Classic Black: This is the go-to black, a deep and inky shade.
- Blue-Black: This black has a slight blue undertone, which can appear cool and crisp.
- Gray-Black: This black has a slight gray undertone, which can add a touch of softness.
In the next section, we’ll explore how to prepare your dress for dyeing and take you step-by-step through the dyeing process. Remember, safety is key, so be sure to have all the proper supplies and follow the instructions carefully. We want your dyeing adventure to be a success!
Here are some additional tips for finding the right instructions:
- Search online for “[fabric content of your dress] + dye instructions” This will help you find a guide specific to your dress’s material.
- Craft stores and dye manufacturers often have detailed instructions available online or on the product packaging.
We can’t wait to see how your dyed dress turns out!
Materials Needed
- Black Fabric Dye: Choose a dye suitable for your dress’s fabric (e.g., Rit Dye, Dylon).
- Large Pot or Bucket: For the dye bath.
- Stirring Stick: A wooden or plastic stick for stirring.
- Rubber Gloves: To protect your hands from the dye.
- Apron or Old Clothes: To protect your clothing while dyeing.
- Plastic Sheet or Newspaper: To protect your workspace.
- Salt or Vinegar: Depending on the dye instructions, for fixing the dye.
- Detergent: Mild detergent for washing the dress.
- Measuring Cup: For measuring dye and other additives.
- Water: Hot water for the dye bath.
Tips and Precautions
- Test Fabric: Test the dye on a small, inconspicuous area of the dress first to check for colorfastness and fabric reaction.
- Uniform Dyeing: Stir the dress constantly while in the dye bath to avoid uneven coloring or streaks.
- Protect Surfaces: Dye can stain, so be careful to protect surfaces and wear old clothes.
- Multiple Dyes: For synthetic fabrics, you might need a special dye (like Rit DyeMore) designed for synthetic fibers.
- Heat Setting: Some fabrics may benefit from a heat setting step, such as ironing, to further set the dye.
By following these steps, you can successfully dye your dress black and give it a new life. Try to dye your dress. Always refer to the specific instructions on your dye package for the best results.